Wednesday, February 20, 2013

Handprint Pillows


Need a good gift idea for someone with kids or someone who loves your kids? Consider a handprint pillow!

I made these for the grandmas, my sister-in-law, and my husband's grandpa. It's an easy project that can be customized for anyone!

Start by tracing the kids hands (or puppy's paw) onto cardboard or heavy paper. Use iron-on transfer (like heat 'n bond or wonder under) to trace the prints onto fabric, and top stitch them into place! I used a simple pillow case and a preform pillow for mine, but you could always make a closed case and stuff your own, too.

All of the recipients of these have loved them, and I've gotten requests from other relatives for some more!

Happy Crafting!
Lisa

Friday, February 8, 2013

Maternity Countdown Shirt


Baby #2 will be here before we know it, and I haven't been very good about taking pictures, but I have crafted up a remedy to that!

I've seen those cute maternity calendar shirts online, but didn't want to pay $30 for one. I found a few tutorials in how to make them (freezer paper stencils with paint, vinyl as a stencil, etc) but I didn't want to paint. I decided to put my cricut mini to work and try to cut fabric with it. The results were mixed. Some of the numbers came out great, but the fabric didn't lay flat all the way with a lot of them.

It took me all afternoon, but I finally got them all on the shirt! I had the shirt in my collection already, and used scrap fabric for the black and an old pillowcase for the white. It turned out pretty good and the best part was that it was FREE!

The hubs always likes to hear about projects that don't cost us anything!

Want to make your own? Block out a lot of time, have a dose of patience, and get to it!

Happy Crafting!
Lisa

Wednesday, January 23, 2013

A Pillow for the Pup

Tonks had an old dog bed that had a hideous red plaid cover. I hated it, and was excited when the zipper broke and I had a good excuse to replace it. I knew this fire hydrant fabric was perfect when I found it at the fabric store, and got some blue fleece to match it.

Tonks was a little confused, but she loves her new pillow, and I think it's much more attractive than the old one!

All I did was use the old cover to get the measurements, then frame the fleece with the fire hydrant fabric. I was going to make it a slip cover like a pillow sham cover, but I had a ridiculous thick zipper lying around, and used the opportunity to install my first zipper.

I dare say it turned out well!

Happy Crafting!

Lisa

Poof Pillow

I have completed another Pinterest project, hooray! Well, technically I completed this project in October, but I made anther one tonight for a friend of The Mouse, who is turning one next month.

Introducing, the poof pillow:

This pillow is perfect for little baby booties, Mama and Daddy heads, and adding a little flair to the living room floor. The Mouse loves to sit and bounce on hers, and looks very proud of herself when she successfully backs her little booty onto it. It also makes a great resting place when she wants to lean, and I plan on making a few more for the playroom in the new house.

The first one I made was a breeze because of this fabulous tutorial (And because I waited until Mom was visiting since I had never used piping and was a bit afraid of it). It was super easy and made me want to use piping on everything I make!

This second one had a snag. Literally, there was a hole in the fabric that I didn't notice until I had already cut out the top.

So what's a crafter to do when an ugly hole threatens to send her back to the fabric store because the pattern calls for one yard and uses almost all of that yard? Well this crafter covered it with an appliqué of the recipient's name! A little more work, but it turned out cute, and now her little sis won't be able to commandeer it later on.

Now don't you just want to run out and make some of these for yourself?

Happy crafting!

Lisa

Saturday, January 12, 2013

Maxi Skirt!

Well I finally got back on the crafting train after a post-holiday hiatus. I needed something that would be quick, easy, and an almost guaranteed success. After struggling with a few holiday crafts, I almost felt like I had lost my crafting mojo. Anyone else ever have this happen?

Anyway, I was perusing Pinterest, and came across this maxi skirt tutorial and decided to give it a go.

My JoAnn is getting ready to move locations and hasn't had any new stock in two months (it's very sad to see the store so picked over, but alas, the new store will be worth it), so their knit selections were limited. Since I decided I can no longer pull off sparkly knits, I stuck with black and grey. Unfortunately, the only grey they had was a polyester knit, which was harder to work with (it's slippery), and has proven to snag a little easier. Oh well, for my first foray into skirt making, it came out just fine!

My advice if you want to make this: try it on as you go (the waist of mine ended up being way too big), and make the waistband longer so you can fold it over! I figure the waistband being big will be convenient as my waistline expands over the next 6 months or so. ;)

Happy Crafting!

Lisa

Monday, December 3, 2012

Turkey Shirt!

The Mouse needed a shirt for turkey day last month, so I scoured Pinterest for inspiration, and came up with this. As you can see, she loved it!

The hardest part was getting all of the ribbon to lay just where I wanted it to so I could sew it on. A few of them were crooked, but she didn't notice. :)

Wednesday, November 7, 2012

Felt Christmas Tree

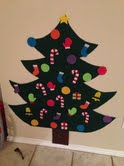
My dear husband accused me of being addicted to crafts this evening. After today, I dare say he might be right.  I finished three projects today during the Mouse's nap times: reusable snack bags, a new dog bed, and a felt Christmas tree.  The felt tree was the last to be finished, and freshest in my mind, so that's where I'll start.

I've seen a ton of tutorials on how to make felt trees, including this one, and this one, so I won't go into too much detail since its already been done!

I bought glittery green felt from JoAnn, and one yard was enough to make 2 trees.  Yes, this means someone I know is getting the other one for Christmas! :). To make my tree shape, I laid the felt out on the floor (during nap time so the Mouse wouldn't crawl all over it and interrupt), and drew on the non-glittery side with chalk.  I had to adjust my lines a few times, but the chalk erases easily.


To get the tree somewhat symmetrical, I drew half of it, then folded it over and patted the top so the chalk would transfer.  It worked like a charm.  I then cut out the tree, and attached half of a brown sheet of felt (also purchased at JoAnn) with hot glue.

To reinforce the edges and give the felt a little more strength, I hot glued pieces of cardboard to the back and nailed it to the wall.  I decided on nails because I knew the Mouse would try to pull it off of the wall, but I used really tiny ones so the felt won't have huge holes in it.

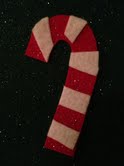
After that, I raided my felt stash and made some ornaments for the tree!  I had some white felt that was sticky on one side, which made adding the small details easier.  For the rest, I used hot glue again.  Since felt sticks to itself, I didn't have to attach anything to the backs of the ornaments and was able to stick them right on.

I love instant gratification projects!

Happy Crafting!
Lisa