Monday, December 3, 2012

Turkey Shirt!

The Mouse needed a shirt for turkey day last month, so I scoured Pinterest for inspiration, and came up with this. As you can see, she loved it!

The hardest part was getting all of the ribbon to lay just where I wanted it to so I could sew it on. A few of them were crooked, but she didn't notice. :)

Wednesday, November 7, 2012

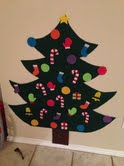
Felt Christmas Tree

My dear husband accused me of being addicted to crafts this evening. After today, I dare say he might be right.  I finished three projects today during the Mouse's nap times: reusable snack bags, a new dog bed, and a felt Christmas tree.  The felt tree was the last to be finished, and freshest in my mind, so that's where I'll start.

I've seen a ton of tutorials on how to make felt trees, including this one, and this one, so I won't go into too much detail since its already been done!

I bought glittery green felt from JoAnn, and one yard was enough to make 2 trees.  Yes, this means someone I know is getting the other one for Christmas! :). To make my tree shape, I laid the felt out on the floor (during nap time so the Mouse wouldn't crawl all over it and interrupt), and drew on the non-glittery side with chalk.  I had to adjust my lines a few times, but the chalk erases easily.


To get the tree somewhat symmetrical, I drew half of it, then folded it over and patted the top so the chalk would transfer.  It worked like a charm.  I then cut out the tree, and attached half of a brown sheet of felt (also purchased at JoAnn) with hot glue.

To reinforce the edges and give the felt a little more strength, I hot glued pieces of cardboard to the back and nailed it to the wall.  I decided on nails because I knew the Mouse would try to pull it off of the wall, but I used really tiny ones so the felt won't have huge holes in it.

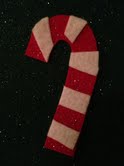
After that, I raided my felt stash and made some ornaments for the tree!  I had some white felt that was sticky on one side, which made adding the small details easier.  For the rest, I used hot glue again.  Since felt sticks to itself, I didn't have to attach anything to the backs of the ornaments and was able to stick them right on.

I love instant gratification projects!

Happy Crafting!
Lisa


Sunday, November 4, 2012

Book to Clutch, Take 1

 It's no secret that I love books.  My husband would probably say I have an unhealthy obsession with them.  I, however, like to think of it as a passion of mine, and see nothing wrong with having 29 boxes of books when we moved.

That being said, book based crafts tend to catch my eye, and this one, which I saw on Pinterest, looked so fun I had to try it right away.  It started with a used copy of Harry Potter, which I got at Half Price Books...
Continued with a small gold clasp, which I had to go to three stores to find (partially because I was still new to Austin and didn't really know where to shop).
And it ended with a very cool book with a secret hiding place inside.  

In the middle there was some glue frustration (I don't think I found the right type, as my pages remained flexible after the glue dried, and I don't think they were supposed to).  It also took a lot longer to carve out than I originally thought it would.  Prisoners who used this method to hide tools were very patient people!

And yes, technically, the tutorial was to make a clutch purse, but Harry Potter books are a bit too thick for that in my opinion.  Next time I'll find one that is slightly thinner if I really want to carry it around.  This one was sent in the mail to a good friend whom I know will appreciate it, and I have a copy of Inkheart waiting to make myself another one.

 Happy crafting!
Lisa


Friday, November 2, 2012

Easy Wall Quote

I had an adorable wall sticker in Amelia's room at our old house, but sadly, it couldn't come with us when we moved.  I still loved the quote, though, so I had to come up with another way to display it on her wall in the new house.  Thus, the idea for the framed quote was born.  I started by combing my local Goodwill for a variety of frames:

A quick coat of black spray paint made these look uniform (sorry, no pictures).

I then found coordinating scrapbook paper in pinks and greens, and played with the words in different fonts and sizes until I had them the way I wanted.  I printed them and cut them out, using double stick tape to adhere them to the backgrounds.  A CriCut or similar tool would have made this faster, but I'm not that fancy yet.  I think it turned out ok anyway, what about you?


Happy crafting!
Lisa